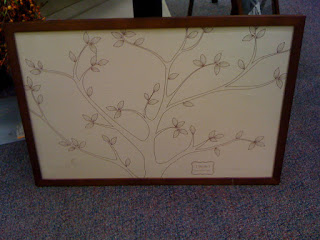
I came across this (very expensive) board in a store the other day. The idea is that you pin pictures of your family to the branches of the tree. A cute homage to genealogy and family. I think this is a great idea for kids who may not get to see all of their extended family on a regular basis.
How easy would it be to put some simple burlap or canvas over an old cork bulletin board. Free hand draw out a little tree and voila. Instant art or even better - Christmas gifts!
Happy Crafting!
Projects
A collection of projects and DIY ideas
Sunday, October 31, 2010
Jewelry storage solution
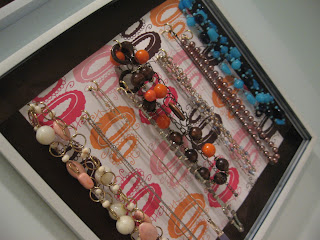
If you're like me, then you've been looking for a good solution to storing your jewelry. I've come across some decent storage solutions, but it's always so hard to see what your options are when everything is piled together in a box. So I came up with this great idea to display them in frames on the wall.
I found these inexpensive frames for displaying t-shirts. I liked these larger sized frames because I can hang my necklaces inside them. The ones I liked were black and I decided I needed white, so I gave them two layers of white with a can of spray paint.

There aren't pictures of the steps in between. I put the frame backing back in (but not the glass) and glued in a 12"x12" piece of scrapbook paper. The frame was a little bigger than that so I also added pieces of grosgrain ribbon around the edges. Next, I hand screwed in little brass decorative hooks I picked up from home depot for the necklaces as alternating heights.

Overall though, I'm very pleased with the final outcome. I love having my jewelry all out and displayed so I know what my options are. My necklaces never get tangled and it looks pretty cool on my bathroom wall as well.
Materials needed:
picture frames
small decorative hooks/eyelet screws
decorative paper/ribbon
glue
modge podge (optional to seal it from moisture)
Total cost: $10
I paid $5 per frame, and 20 cents for a piece of fancy paper and maybe 5 cents for the amount of grosgrain i used. The decorative hooks you need to buy in packages of 8 or like 25, so I'd estimated it out at about $5 total. So if you make more than one, the cost goes down incrementally.
Happy crafting!
Friday, October 1, 2010
Glove animals
I'll open this blog with my most recent project. Glove animals. I noticed those little cotton gloves on sale at Joann's for only $1 a pair. And you know what else I noticed standing in line at the fabric store? How easy it would be to turn them into an animal.
Before:
Remember these from your childhood? I bet you have at least one lying around your house right now. If you can scrounge up a pair, you have an instant project (and free gift to give your favorite child!).
Sock and Glove animals have been around forever, so a simple google search turned up some ideas and easy instructions. I've tweaked it a little bit and present: Glover the dog.
If you're going to do this project, I suggest you google some step by step directions with pictures.
After:
Here's my 10 or fewer basic steps.
1-Turn both gloves inside out, cut off the two middle fingers and the thumbs. Set aside the other glove.
2- Sew up the finger holes on glove #1, turn it right side out and stuff with poly fiber fill. This is the body of the dog and the fingers are the legs.
3- Take the remaining three fingers, stuff and sew them back onto body as the arms and a tail.
4- Set the body aside and with glove #2 still inside out, sew up the thumb hole. Rotate and flatten the glove so the former thumb hole is on the front and positioned in the mouth/nose area.
5-Sew and cut out a semi circle along the glove cuff. (A smiley face under the thumb hole).
 6-Turn right side out and stuff the body (but not the fingers this time). Sew up the remaining opening on the top of the head from the outside (if you're using safety eyes remember to attach them)
7-Sew the head to your body.
8- Sew the ears down in desired positions.
9- Embellish how you wish. Attach the eyes, embroider a nose, (or use buttons. I have a 6 month old, so I decided to play it safe). I used red felt for the tongue and heart patch on the rump :) I also added the bottom section of the mouth area because the neck seemed too long. You could do this or use the scrap from step 5 to sew on a bottom lip.
I'm already thinking about how you'd make all kinds of other animals and am planning a trip back to buy more gloves.
UPDATE: right now Target is selling two pairs for $1. Go get em!
Materials needed:
A pair of gloves
sewing supplies (thread, needle, scissors)
red felt
safety eyes
polyester fiber fill
Approximate cost: $1.50
I already had the poly-fill (it's approx. $4 for a large bag that will last you through several projects), thread, needles and red felt. I also had the safety eyes from another project which I think were about $1.50 for 3 pairs. I added the cost of one set into the total.
Before:
Remember these from your childhood? I bet you have at least one lying around your house right now. If you can scrounge up a pair, you have an instant project (and free gift to give your favorite child!).
Sock and Glove animals have been around forever, so a simple google search turned up some ideas and easy instructions. I've tweaked it a little bit and present: Glover the dog.
If you're going to do this project, I suggest you google some step by step directions with pictures.
After:
Here's my 10 or fewer basic steps.
1-Turn both gloves inside out, cut off the two middle fingers and the thumbs. Set aside the other glove.
2- Sew up the finger holes on glove #1, turn it right side out and stuff with poly fiber fill. This is the body of the dog and the fingers are the legs.
3- Take the remaining three fingers, stuff and sew them back onto body as the arms and a tail.
4- Set the body aside and with glove #2 still inside out, sew up the thumb hole. Rotate and flatten the glove so the former thumb hole is on the front and positioned in the mouth/nose area.
5-Sew and cut out a semi circle along the glove cuff. (A smiley face under the thumb hole).
 6-Turn right side out and stuff the body (but not the fingers this time). Sew up the remaining opening on the top of the head from the outside (if you're using safety eyes remember to attach them)
 7-Sew the head to your body.
8- Sew the ears down in desired positions.
9- Embellish how you wish. Attach the eyes, embroider a nose, (or use buttons. I have a 6 month old, so I decided to play it safe). I used red felt for the tongue and heart patch on the rump :) I also added the bottom section of the mouth area because the neck seemed too long. You could do this or use the scrap from step 5 to sew on a bottom lip.
Kid approved:
I'm already thinking about how you'd make all kinds of other animals and am planning a trip back to buy more gloves.
UPDATE: right now Target is selling two pairs for $1. Go get em!
Materials needed:
A pair of gloves
sewing supplies (thread, needle, scissors)
red felt
safety eyes
polyester fiber fill
Approximate cost: $1.50
I already had the poly-fill (it's approx. $4 for a large bag that will last you through several projects), thread, needles and red felt. I also had the safety eyes from another project which I think were about $1.50 for 3 pairs. I added the cost of one set into the total.
Subscribe to:
Comments (Atom)


